Almost every lens changes the way your image looks by warping it in some way. Each lens can create barrel distortion, vignetting at big apertures, chromatic aberration, and more.
Some lenses have more distortion than others. Let's look at four tools in Lightroom's lens correction module that are a lifesaver
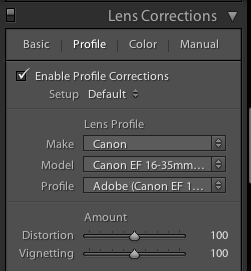
1. The easy button - lens profile corrections in one click
Before lens corrections:

Brick wall at 16mm, f/2.8, ISO 1250. You can see the 'bulge' in the middle because the horizontal lines are not parallel. Also notice the dark corner vignetting from shooting wide open at f/2.8
After one-click lens correction:

Same settings as above but with lens profile correction applied. Note the parallel horizontal lines and no more dark corners.
I shot this wall on a 16-35mm f/2.8 lens at f/2.8 to illustrate the 'bulge' in the middle and vignetted corners. These are distortions from the Canon 16-35mm f/2.8L II lens.

Lightroom is already loaded with profile corrections for this specific lens! Just click "enable profile corrections" in the "Profile" section of the Lens Correction module and Lightroom will fix the distortion for the lens you used!
Finding your lens profiles on older versions of Lightroom
As Lightroom keeps rolling out newer versions, it rolls out profiles from newly released lenses. If you are using Lightroom 3 from 2010 but have a lens that hit the market in 2012, Lightroom won't have it in there.
You can go download Adobe Lens Profile Creator to look up your lenses, grab their profiles, and manually add them to Lightroom.
I use the profile corrections on almost all of my images
Unless you have a very specific reason to manually deal with it, I suggest that you just use Lightroom's built-in profile corrections most of the time.
While you can certainly change all these lens corrections manually, in most cases it makes more sense to let Lightroom do the hard work for you.
2. The vertical slider

The problem
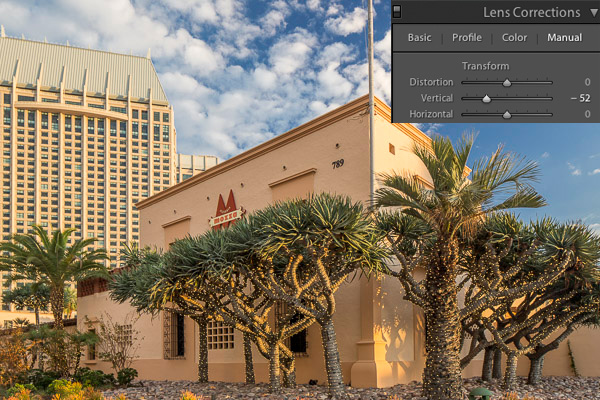
I photographed this shot above for a commercial builder. Notice how the building in the back is falling over, and the one in front has vertical lines that aren't parallel? Rather than repeat this excellent DPS article (Why are my Buildings Falling Over? A Short Guide to Perspective Distortion and Correction in Photography) that describes why this happens, I'll show you how to correct it.
The solution
I pull the vertical slider to the left until the lines are parallel.

Crop it
Notice anything weird? When you shift the vertical axis you lose some of the image. Architecture photographers use tilt-shift lenses to correct this in camera without losing any of the image.
Since I didn't have one at the time, I corrected it in Lightroom by cropping the white part out.

3. The horizontal slider
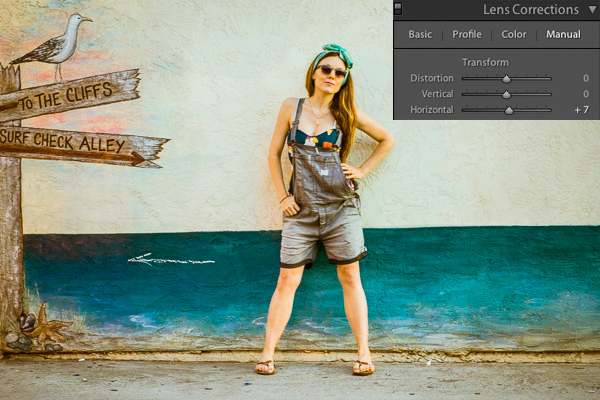
Sometimes you might be in a hurry and shoot a photo that needs to be slightly shifted horizontally in post. I did this during a fashion shoot.

The problem
I took the photograph without realizing I was slightly positioned to the side of the wall vs. straight on. If you look closely, you can see the line where the wall hits the ground, and that it slightly angles from bottom left to top right.
The solution
Using the horizontal slider and shifting it slightly to the right will tilt this photo so the right side appears to come closer to the viewer and the left side moves further away from the viewer. The result is that now the photo is perfectly square with the wall and the line along the bottom is level.

4. Vignette slider
The problem
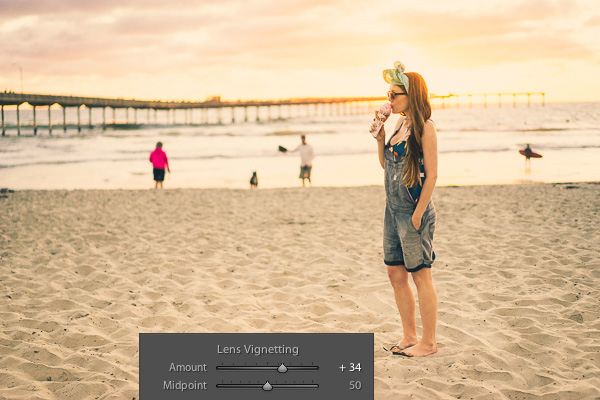
When shooting at big apertures most lenses create some form of vignette, meaning dark corners in the photo. Sometimes these can be attractive, but sometimes you don't want them.
I shot this photo at f/1.8. Do you see the dark corners? I want to remove those.

The solution
Simply pull the vignette slider in the Lens Correction manual module to the right to reduce a vignette.

Vignettes are a matter of personal preference. I don't think the first photo looks bad with the vignette, I just wanted it without it. You can use the vignette slider to create or enhance a vignette by pulling the slider to the left.
Pro tip: if you've cropped the image at all, you will want to use the post-crop vignetting tool in the "effects" dialog box. The vignette slider in the lens corrections module affects the original image size, regardless if you've cropped it.
If you want to see these tools in action, check out the video below:
I hope you found this helpful - happy editing!
The post Four Under-Used Tools in Lightroom's Lens Correction Module by Mike Newton appeared first on Digital Photography School.
No comments:
Post a Comment