Sunday, March 31, 2013

The Textures of the Guadalupe River


Ask any high school student where and when the best “river tubing” can be found in Texas and nine out of ten will tell you “on the Guadalupe this weekend, Dude”. Ask any landscape photographer where and when the most beautiful cypress trees can be found and they’ll tell you “on the Guadalupe River whenever the kids are back in school”. Which is one of the reasons I schedule the Texas Landscape Safari workshop for the middle of the week well after spring break!


One of my favorite riverside spots is in Guadalupe River State Park near Spring Branch, Texas. The upper Guadalupe river runs through the park in the heart of the Texas Hill Country, and in this spot is a small and fast moving stream lined with tall limestone banks and shaded by 100 year old pecan and bald cypress trees. On a quiet spring afternoon these beautiful trees offer plenty of shade and endless photographic opportunities. The combination of swiftly running water and these huge trees is a favorite subject of many Texas photographers, myself included.


Texture


Texture – Guadalupe River State Park, Texas
Copyright 2010 Jeff Lynch Photography
Shot taken with a Canon Powershot G10 set on aperture priority (Av) using a circular polarizer. The exposure was taken at 32mm, f/7.1 for 1/2 second at ISO 80. All post capture processing was done in Adobe’s Lightroom 3. Click on the image above for a larger version.


Click on the image above for a larger version.


Filed under: Photography Tagged: Adobe Photoshop Lightroom 3, Canon, Canon Powershot G10, Guadalupe River State Park, Landscape Photography, Nature Photography, Photography, Texas Hill Country, Texas Landscapes

Frio River Sunset


Speaking of beautiful Texas rivers, I’m heading for a quick weekend trip to central Texas to photograph the four main rivers that run through the Hill Country; the Nueces, the Frio, the Sabinal and the Medina rivers. All four of these small rivers eventually meet up and flow out into the Gulf of Mexico but in the dry Hill Country they are the lifeline for ranchers and farmers alike.


Central Texas Rivers


Each river has its own character but all have one thing in common; the wonderful Cypress trees lining the river banks. These majestic trees offer much needed cover for the river dwellers in the hot summer and provide a beautiful backdrop for wildlife and nature photography. Add the crystal clear waters running in these four rivers and you’ve got a great place to spend a few warm spring days.


Frio River Sunset


Frio River Sunset – Concan, Texas
Copyright 2011 Jeff Lynch Photography
Shot taken with a Canon EOS 5D Mark II set on aperture (Av) priority using an EF 17-40mm f/4L USM lens tripod mounted. The exposure was taken at 40mm, f/16 for 1/5th of a second at ISO 100 using a Singh-Ray warming polarizer and two-stop, soft graduated neutral density filter. Post capture processing was done entirely in Adobe’s Lightroom 3.


Click on the image above for a larger version.


Filed under: Photography Tagged: Adobe Photoshop Lightroom 3, Canon, Canon 5D Mark II, Canon EF 17-40mm f/4L USM, Frio River, Landscape Photography, Nature Photography, Photography, Texas Hill Country, Texas Landscapes

Friday, March 29, 2013

Bastrop State Park


Bastrop State Park is only about 30 miles southeast of Austin but once you enter it’s like you’re a million miles from the city. The park is surrounded by tall pines which block much of the noise from the highway and it’s 6000 acres of hilly terrain offer miles of trails to explore to your heart’s content. My favorite spot is the small lake near the park historic cabins and camp sites. On any given weekend you’ll find folks fishing from it’s quiet banks and enjoying the sun and wind. As you can see, it’s also a fine spot for a little late afternoon photography.


Bastrop Lake


Bastrop Lake – Bastrop State Park, Texas
Copyright 2010 Jeff Lynch Photography
Shot taken with a Canon EOS 5D Mark II set on aperture (Av) priority using an EF 17-40mm f/4L USM lens tripod mounted. The exposure was taken at 22mm, f/16 for 1/15th of a second at ISO 100 using a Singh-Ray warming polarizer and two-stop, soft graduated neutral density filter. Post capture processing was done entirely in Adobe’s Lightroom 3.


Click on the image above for a larger version.


BTW – Some folks have asked how I create the white inner border and darker outer border on my images. I’d love to take credit for this but honestly I use a simple plug-in for Adobe Lightroom 3 called LR/Mogrify 2 from Tim Armes’ Photographer’s Toolbox. Tim has lots of great plug-ins available for Lightroom and I’m a big fan of his work.


Filed under: Photography Tagged: Adobe Photoshop Lightroom 3, Bastrop State Park, Canon, Canon 5D Mark II, Landscape Photography, Nature Photography, Photography, Texas Hill Country, Texas Landscapes

Workshop Preparation – Packing for Landscape Photography


As we discussed last week and earlier this week, gear selection and packing for a landscape photography trip is a cumbersome task. Each time I set out for a few days or a few weeks I begin by putting together a shoot list and hiking schedule. I also check the weather forecast for the area of Texas I’ll be traveling though and pray for any cold fronts approaching from the north or west. The last thing I want is a cloudless sky.


Packing for Landscape Photography


Pulling together a shoot list is a common enough task for most commercial photographers but I find few landscape or nature shooters that follow this discipline. I like to maximize my time in the field but I can’t carry fifty pounds of cameras and lenses on each hike so a shoot list is essential.


So here is a list of what I pack for a typical landscape outing.


  • Canon 5D Mark II with EF 17-40mm f/4L USM zoom attached.
  • Canon EF 70-200mm f/4L zoom with lens hood.
  • Canon TS-E 24mm f/3.5L II Tilt & Shift Lens.
  • Gitzo Traveller Tripod & RRS Ballhead.
  • Singh-Ray CP, Vari-ND & ND Grad filters.
  • Black Rapid R-Strap & Clips.
  • Bubble level, CF cards, lens cloths.
  • Garmin GPS on one strap.
  • Motorola MR350 Two Way Radio on the other strap.
  • Emergency Thermal Mylar Blanket.
  • Hiker’s First Aid Kit.
  • LED Flashlight & Hunting Knife.
  • Emergency Bail-Out Rope.
  • Water, typically three 24oz bottles.
  • Trail Snacks (for energy).

This much gear weighs in a little under 20 lbs and fits comfortably in my pack. The nice thing is, the weight decreases during the hike as I consume my water supply and trail snacks. I caution folks about carrying too much weight in their packs. I’ve done these hikes and climbs several times in the past few years and every extra ounce of weight you carry takes that much more energy. When you’re out shooting in nature, the last thing you need to be thinking about is how sore your lower back is from lugging around all that gear.


In fact, during my spring workshop (Texas Landscape Safari) I may carry only one lens (24-105mm) on my 5D2 and a few filters in my pockets. I load my pack up with as much water as I can carry along with some apples for energy. One thing I tell all my attendees; if it’s a choice between a lens or a bottle of water, always take the water. The Texas sun can be a relentless companion and folks that don’t respect its strength soon find themselves dehydrated and exhausted. Not a great combination for a budding landscape photographer during a workshop.


Filed under: Photography Tagged: Canon, Canon 5D Mark II, Landscape Photography, Nature Photography, Photography, Texas Hill Country, Texas Landscape Safari, Texas Landscapes

Thursday, March 28, 2013

Rio Grande Hoodoos


Rio Grande Hoodoos


Rio Grande Hoodoos – Big Bend Ranch State Park, Texas
Copyright 2011 Jeff Lynch Photography
Shot taken with a Canon EOS 5D Mark II set on aperture (Av) priority using an EF 24-105mm f/4L IS USM lens tripod mounted. The exposure was taken at 24mm, f/14 for 1/20th of a second at ISO 100 using a Singh-Ray warming polarizer filter and 2-stop graduated neutral density filter. Post capture processing was done in Adobe’s Lightroom 3 and Photoshop CS5.
Click on the image above for a larger version.


Filed under: Photography Tagged: Adobe Photoshop CS5, Adobe Photoshop Lightroom 3, Big Bend Ranch State Park, Canon, Canon 5D Mark II, Canon EF 24-105mm f/4 L IS USM, Landscape Photography, Nature Photography, Photography, Texas Landscapes, West Texas

The Wall


If you listen to the national news you might get the impression that the border between the US and Mexico is one very large and flat expanse of territory inhabited by little more than cactus and rattlesnake. Nothing could be farther from the truth in the Mexican mountains leading to the Rio Grande river near Lajitas, Texas.


The elevation difference between the Mexican side of the border and our’s is a good 400 foot drop straight down into Santa Elena Canyon making it all but impassible. There are few trails running along this unique geology between our two countries and the climb down looks treacherous indeed.


There may not be a fence between the US and Mexico along this stretch of the border but nature has provided a wall grander than anything man could build.


The Wall


The Wall – Santa Elena Canyon in Big Bend National Park, Texas
Copyright 2011 Jeff Lynch Photography
Shot taken with a Canon EOS 5D Mark II set on aperture (Av) priority using an EF 17-40mm f/4L USM lens tripod mounted. The exposure was taken at 30mm, f/16 for 1/40th of a second at ISO 100 using a Singh-Ray warming polarizer filter and 2-stop graduated neutral density filter. Post capture processing was done in Adobe’s Lightroom 3 and Photoshop CS5.
Click on the image above for a larger version.


Filed under: Photography Tagged: Adobe Photoshop CS5, Adobe Photoshop Lightroom 3, Big Bend National Park, Canon, Canon 5D Mark II, Canon EF 17-40mm f/4L USM, Landscape Photography, Nature Photography, Photography, Texas Landscapes, West Texas

Tuesday, March 26, 2013

Magnificent Mirror Symmetry Long Exposures of Nighttime Japan


japan long exposures 01 Magnificent Mirror Symmetry Long Exposures of Nighttime Japan


Tokyo, Japan-based photographer Shinichi Higashi takes long exposures to exciting new levels with his series Graffiti of Speed/Mirror Symmetry. While his colorful light trails seem incredibly futuristic set against Japan’s modern architecture, it’s this masterful merging of two identical images that makes this series so interesting.

japan long exposures 9 2 Magnificent Mirror Symmetry Long Exposures of Nighttime Japan


See more at My Modern Met.


Free Magic Giveaway - Win Your Very Own Foldable Cardboard Buddy!

Beautiful Image Lightboxes – only $27!


md3 Beautiful Image Lightboxes   only $27!


Photos can be a key component of your website, no matter what your content. And these days, how you display your photos is as important as what you’re showcasing. That’s why Visual LightBox is a no-brainer for anyone looking to give their web gallery a gorgeous face-lift. And thanks to this Mighty Deal, you can save over 60% on this powerful application for Mac and Windows.

Visual Lightbox normally sells for $69 but for a limited time only, you can purchase this gorgeous photo gallery generator for just $27! That’s a savings of 61% off the regular price!
Read more.


Free Magic Giveaway - Win Your Very Own Foldable Cardboard Buddy!

Friday, March 22, 2013

15 Free Appealing Textures for Designers


Basketwork 650x487 15 Free Appealing Textures for Designers


Fabric Texture B + W Checkered 650x454 15 Free Appealing Textures for Designers


Textures become the basic need of almost all designers. Because there are different types of textures and all textures give different look and give various messages to designers which a designer intend to communicate.


For More Textures >>


30 Modern & Creative WordPress Themes For Designers


30 Modern Creative Wordpress Themes For Designers 30 Modern & Creative WordPress Themes For Designers


oday Our WordPress roundup about Modern & Creative WordPress Themes that's can be used in multipurpose like " Portfolio,Agency,Business and Vcards" We Aim in this round up to Give you idea about how creative and Modern wordpress can be used.readmore


Thursday, March 21, 2013

The Haoduo Panda Hotel – World’s First Panda Hotel


Located at the foot of Emei Mountain in southwest China's Sichuan province, the quirky hotel has rooms decorated with panda pictures, cuddly panda soft toys perched on beds, tables and chairs, and staff that dress up in panda costumes to entertain guests.


The-Haoduo-Panda-Hotel_1


The-Haoduo-Panda-Hotel_2


The-Haoduo-Panda-Hotel_4


The-Haoduo-Panda-Hotel_8


More pics and info here.


Murals by Escif in Valencia


Escif's newest wall entitled "Neo-Liberalism" strongly resembles and we are confident that it is, Arnold Schwarzenegger aka the "Governator'" in his body building hay days. Painted in the streets of Valencia, Spain.


Escif_New_Murlas_Velencia_01


Escif_New_Murlas_Velencia_04


Escif_New_Murlas_Velencia_06


Escif_New_Murlas_Velencia_07


Escif_New_Murlas_Velencia_08


More pictures an info here.


Wednesday, March 20, 2013

The History of Plumbing [Infographic]


plumbing history 650x1236 The History of Plumbing [Infographic]


Ever stop and think how we as a civilization got to proper plumbing habits? This infographic courtesy of http://www.plumber24hours.co.uk takes a look at that very question.


read more


Be a Women by Huljak Stephen


China Dream.


Be a Women by Huljak Stephen


Be a Women by Huljak Stephen


Be a Women by Huljak Stephen


Be a Women by Huljak Stephen


Be a Women by Huljak Stephen


Visit Huljak Stephen


Tuesday, March 19, 2013

Paintings on Books 2 by Russell Cobb


A series of self initiated paintings painted on books found in old book shops.


Paintings on Books 2 by Russell Cobb


Paintings on Books 2 by Russell Cobb


Paintings on Books 2 by Russell Cobb


Paintings on Books 2 by Russell Cobb


Paintings on Books 2 by Russell Cobb


Paintings on Books 2 by Russell Cobb


Paintings on Books 2 by Russell Cobb


Paintings on Books 2 by Russell Cobb


Visit Russell Cobb


Studio Work by Julia Kuzmenko McKim


After a couple of years of shooting with natural light and flashes, I am finally back in a studio. I have got a handful of most beautiful & talented models of Midwest to work with while I am still in Omaha. The Makeup Artist/Hair Stylist – Mikala Vandenbroucke – is to die for!


Studio Work by Julia Kuzmenko McKim


Studio Work by Julia Kuzmenko McKim


Studio Work by Julia Kuzmenko McKim


Studio Work by Julia Kuzmenko McKim


Studio Work by Julia Kuzmenko McKim


Studio Work by Julia Kuzmenko McKim


Studio Work by Julia Kuzmenko McKim


Studio Work by Julia Kuzmenko McKim


Studio Work by Julia Kuzmenko McKim


Visit Julia Kuzmenko McKim


Monday, March 18, 2013

Illustrator Roy Nachum


RoyNachum00 Illustrator Roy Nachum


Roy Nachum's latest painting, sculpture and art installation series, 'Blind', owes its origins to a rather serendipitous encounter of the artist with Braille signage at a museum exhibition. The incident got Nachum thinking on how he could let visually impaired people experience his artworks. He soon forced himself to "recontextualize his signature pixel technique into Braille," and it soon became a tool, both literally and metaphorically, in the creation of all his new works.


RoyNachum12 Illustrator Roy Nachum


RoyNachum01 Illustrator Roy Nachum


MORE PHOTOS HERE


Like us on Facebook for More Exclusive Photos!


Official website: www.roynachum.com


10 Techniques for Amazing Portraits


A guest post by San Diego Wedding Photographer, Wayne Yuan


As full-time photographers shooting 30+ weddings a year, we have to admit, sometimes it’s easy to fall into the same old formulas when it comes to portraits. Even with new poses, taking portraits can become very mundane if the same compositions and angles are used for every couple–we’ve definitely been through that creative rut where our pictures start looking very familiar. Throughout the years, we’ve challenged ourselves to stay on top of our game with a few useful techniques. Here are some of our best tips to help keep things fresh and unique for each couple.


1. Use a longer lens.


A lot of photographers out there say that their 50mm is a “must-have” portrait lens, but what a mid-range lens offers is a very familiar perspective, something that our eyes are used to seeing all the time. To create a more interesting image, we avoid shooting portraits in mid-range because the images look too ordinary. Most of our portraits are shot at 200mm or 85mm to create beautiful image compression that a 50mm would not be able to produce. The compression will not only flatter your subjects with less feature distortion, but shooting at a longer focal length will also create more dramatic background blur (bokeh) and brings the background closer to your subject. It may be more difficult to communicate with your subjects while shooting at 200mm, but the difference will be apparent and well worth it. Our solution to this problem was to have one of us interact with our couples at close range while the other shoots from a distance.


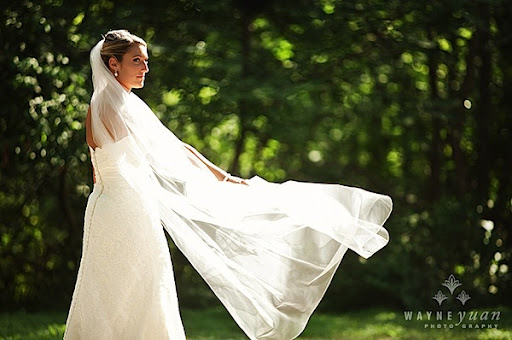
best_wedding_photos_01.jpeg


best_wedding_photos_02.jpeg


best_wedding_photos_03.jpeg


2. Find angles that aren’t eye level.


Many times we are stuck seeing what is right in front of us. It is, after all, the easiest answer to everything. Challenge yourself to find a different angle from above or below eye-level to bring a new perspective to the image. This technique can also be used to flatter subjects of different body types and heights. In the image below, we asked the bride to sit on the ground in order to focus on her face and hair ornament while blurring out the rest of her body. It makes a more interesting image than the typical straight-on bridal portrait.


best_wedding_photos_04.jpeg


3. Use off-camera flash.


During a wedding, our speedlites are never on-camera, even during the reception. Flash rarely flatters a person’s face when it is straight on, and the image looses its dimensionality. Using flash to light our subjects from the side, we are able to create both light and shadow on our subjects, flattering their features and bringing a greater range of highlights and shadows to the image. It also helps us bring out details in the background to create a more dramatic landscape.


best_wedding_photos_05.jpeg


4. Overpower the sun with flash.


Shooting at mid-day is no easy task when using natural light. But with some artificial lights, something as simple as a couple of speedlites can diminish the power of the sun and darken the image for better exposure. We use this technique especially when we are trying to create environmental portraits that focus on the landscape. Using our speedlites, we are able to overpower the sun and underexpose the sky while only lighting up the subject. To create this amount of artificial light, we have to use 2-4 off-camera speedlites (with no diffuser) in order to generate enough light to overpower the sun. Holding the speedlites closer to the subject (to the side) also helps put more light on the subject and allows us to underexpose the background even more for dramatic effect.
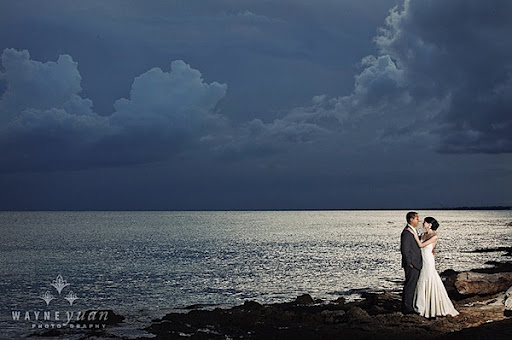
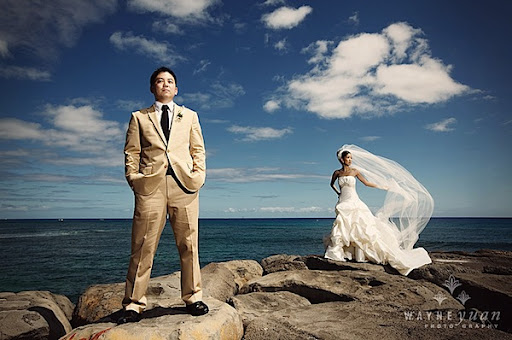
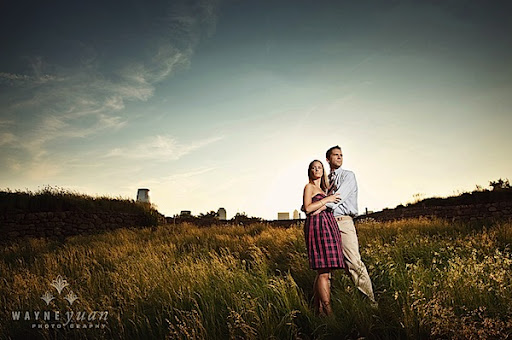
best_wedding_photos_06.jpeg


best_wedding_photos_07.jpeg


best_wedding_photos_08.jpeg


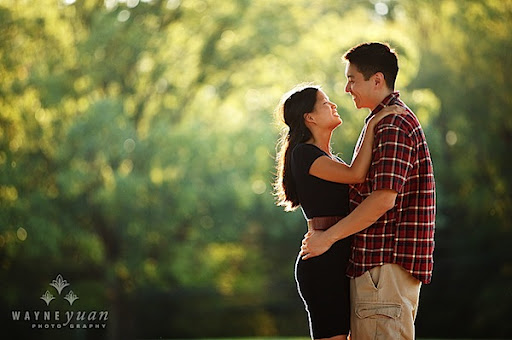
5. Find back-light.


It takes time and practice to train your eye to find great light. Once you learn how to “find the light” in any situation, it will help you master taking some amazing portraits. Lighting is, after all, the essence of photographic images. Whether you are using the sun, a window, or an ordinary light bulb, these light sources can be used to create beautiful edge light (a.k.a. hair light, rim light) when the light source is place behind your subject. The effect that rim light creates can enhance the dimension of your image by separating your subject from the background, outlining and focusing on your subject.


best_wedding_photos_09.jpeg


best_wedding_photos_10.jpeg


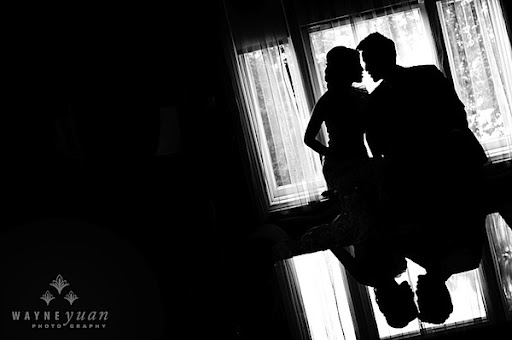
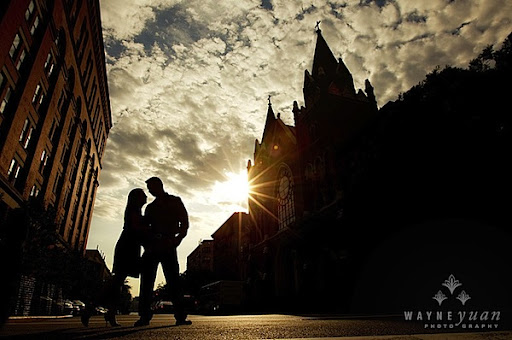
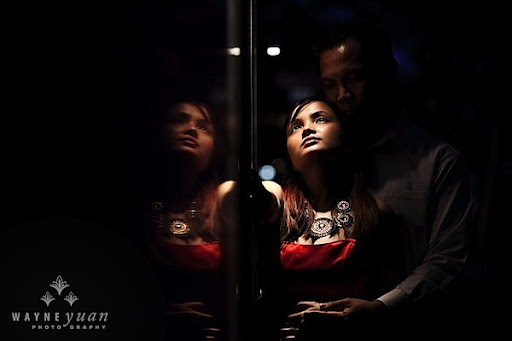
6. Look for silhouettes and reflections.


Learning to look for reflective surfaces and silhouetting opportunities will greatly enhance your images both visually and in depth. For silhouettes, it is key to find a strong light source and place it behind your couple; this could be anything from the sky to a window or even a patch of light on a wall. For reflections, try to be creative with the different types of reflective surfaces; sometimes, the best reflections are found in unexpected places like floors, glass, puddles, and granite walls.
best_wedding_photos_11.jpeg


best_wedding_photos_12.jpeg


best_wedding_photos_13.jpeg


7. Shoot through objects.


When objects are in our way, we like to use them to our advantage. In fact, many times we are purposely trying to find elements to place in the foreground of our image. Learning to find holes between tree branches, abstract objects, or even ordinary household items are simple, everyday things that will help enhance your images by bringing an interesting, and sometimes colorful, element to your composition. Using a longer lens will help blur out the foreground objects to frame the subjects in a more intimate way.

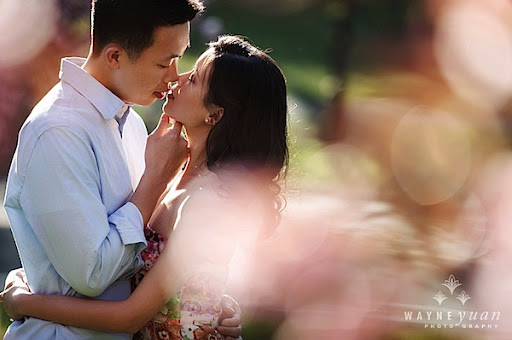

best_wedding_photos_14.jpeg


best_wedding_photos_15.jpeg


8. Use the sun as a light source.


It is not uncommon for photographers to avoid shooting in the sun and run for the open shade for an easier and even exposure. We covered back-lighting earlier as a solution for shooting in harsh sun-lit situations. But sunlight can also be used as a direct spotlight on your subject. By exposing for the areas directly in contact with the sun, the background and surrounding shadows will dramatically darken, drawing focus and light to your subjects. Applying this technique to different lighting situations will create varying visual effects.


best_wedding_photos_16.jpeg


best_wedding_photos_17.jpeg


9. Use video light for night portraits.


Video lights are very useful when no light source is available to light up your subject in dark situations. The great thing about video lights is that they are a constant light source so you can see what the image will look like in camera. We use LED video lights, which give us enough power to last 2+ hours. They are a great alternative to speedlites for low light situations and are quicker to adjust for dark situations.


best_wedding_photos_18.jpeg


best_wedding_photos_19.jpeg


10. Use gels on your speedlites.


Adding CTO (orange) or CTB (blue) gels to your speedlites will change the mood of your image. Sometimes shooting in an environment which is overcast and very blue, adding a CTB gel will warm up the whole environment if you adjust the white balance correctly. CTO gels can also be used to emulate sunlight.


best_wedding_photos_20.jpeg


For more examples of on how to take great images, check out our website: San Diego Wedding Photographer – Wayne Yuan


Wayne and Angela are photographers/owners of Wayne Yuan Photography. They live in San Diego and New York area, but shoot weddings worldwide.


Join our Facebook Fanpage | Ask a question on our Formspring | Contact Us


portrait-tips.jpg


Post originally from: Digital Photography Tips.

Check out our more Photography Tips at Photography Tips for Beginners, Portrait Photography Tips and Wedding Photography Tips.


10 Techniques for Amazing Portraits