Saturday, August 31, 2013

Shoot Everything Around You!


Just a quick tip for a sleepy Monday morning.


In the world of digital photography, film is essentially free. So shoot everything around you. You never know how a shot will turn out unless you actually take it and no one will ever see your rejects!


I shot this image a few weeks ago at McKinney Falls on a cold, damp and dreary afternoon. Given the weather, I was surprised to see so many folks visiting the falls and couldn’t get a clear shot at the part of the falls that most interested me. Rather than become frustrated I began looking around at the water, the cypress trees and the unusual rock formations all around me. I could see all sorts of potential shots, most quite different from the typical waterfall shots I’d planned. I honestly didn’t know if any of these would turn out, but taking them kept me creatively “limber” while I waited for the tourists to wander off.


I notice this a lot at my workshops. Most folks will concentrate so hard on the subject at hand that they forget to look around for other potential subjects. With digital, film is essentially free so I encourage folks to shoot everything around them, looking for different foreground subjects and different angles. If you don’t think this works, take a look at Thomas Hawk’s incredibly popular Flickr stream. Talk about a prolific shooter!


In Motion – (Onion Creek) Austin, Texas
Copyright 2009 Jeff Lynch Photography
Shot taken with a Canon EOS 5D Mark II set on manual (M) using an EF 24-105mm f/4L IS USM lens tripod-mounted. The exposure was taken at 47mm, f/16 for 4 seconds at ISO 100 using a Singh-Ray Vari-ND-Duo neutral density and warming polarizer filter. All post capture processing was done in Adobe’s Lightroom 3 Beta. Click on the image above for a larger version.


Posted in Photography Tagged: Canon, Canon 5D Mark II, Landscape Photography, McKinney Falls State Park, Nature Photography, Photography


Autumn Reflections


Its been a year of strange weather here in Texas. We started out the year in severe drought and the spring and summer months brought little respite. We finally began to get some much-needed rain in the early fall but by then the trees had gone brown and dry. Its been the worst fall color season that I can remember and the earliest I’ve ever seen the trees begin to shed their leaves.


Autumn Reflections – Smithville, Texas
Copyright 2009 Jeff Lynch Photography
Shot taken with a Canon EOS 5D Mark II set on manual (M) using an EF 24-105mm f/4L IS USM lens hand-held. The exposure was taken at 40mm, f/16 for 1/20th of a second at ISO 100 using a Singh-Ray warming polarizer. All post capture processing was done in Adobe’s Lightroom 3 Beta. Click on the image above for a larger version.


I had high hopes to capture some fall color around Austin last weekend but most of the leaves had already fallen or turned brown. I finished my Saturday afternoon workshop a little early (it was damn cold) and decided to enjoy the drive along Park Road 1C which runs between Bastrop and Buescher state parks. The 15 miles of winding road through the “Lost Pines” is always a treat for the senses.


I decided to stop at the lake near the entrance of Buescher State Park to see if I could spot any birds to photograph and could hardly believe my luck in finding still waters and a beautiful cobalt blue sky. Some days you just get lucky!


Posted in Photography Tagged: Bastrop State Park, Buescher State Park, Canon, Canon 5D Mark II, Landscape Photography, Photography, Texas Landscapes


Friday, August 30, 2013

Samurai Girl Composite: Behind the Scenes Post Production Walk Through


by Tom Di Maggio


In this article I'll show you how the "Samurai Girl" picture was done step by step. In addition there is a speed art video at the end of the article that shows the whole process from start to end in a 05:47 minutes Youtube video. It should make the whole process clearer.


Feel free to send me your questions via email at tom@purple-monkey.com
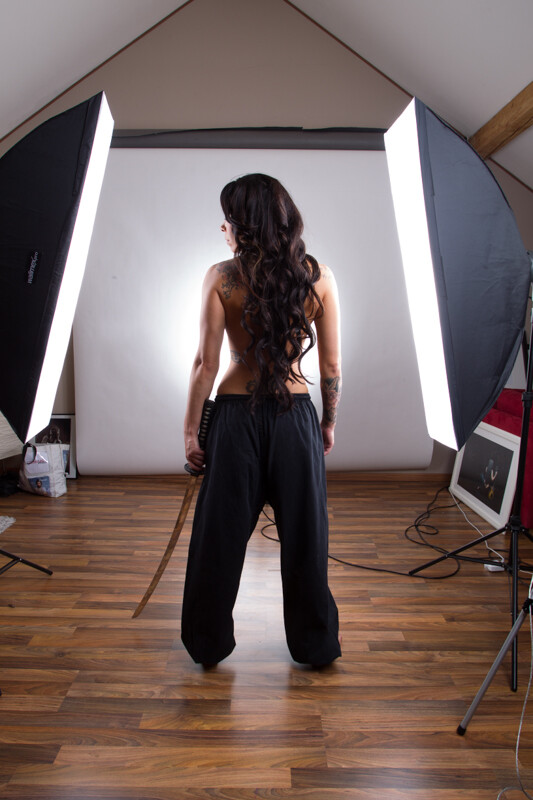


1 Base Image Jessica


Here is the image as it was shot. Before I start to extract the subject I use a technique to create that look on my models that consists of 6 Layers. I will write a separate tutorial on that topic, as it will deviate too much from the point of this tutorial.
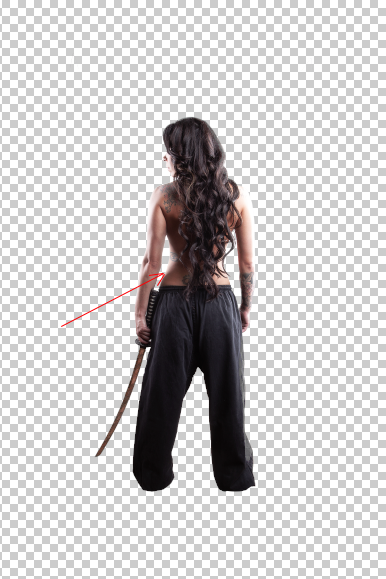


2 Model Liquify copy


I started with cutting out Jessica from the background. When you know that you are going to extract the subject for a photo manipulation or composite, make sure you shoot them on a background that will create an nice contrast around the edges. It will make your life a lot easier for the extraction process. The method I use to extract my subjects varies a lot depending on the need and the situation. The tools I usually use are the Pen Tool, Brush, Refine Edge, Lasso, Quick Selection and the Blending Option effects. In this case I used a mixture of Pen Tool, Brush and Refine Edges.



3 Mask


Here is a picture of the finished mask. I like to check the mask for imperfections by "Alt" clicking on the layer mask.. What I also do a lot is to check the mask against a white and a black background. I will usually show you all the imperfections on the mask especially fringing. If the extraction looks good against both backgrounds, then you can be sure that you won't need many adjustments anymore against your final background.
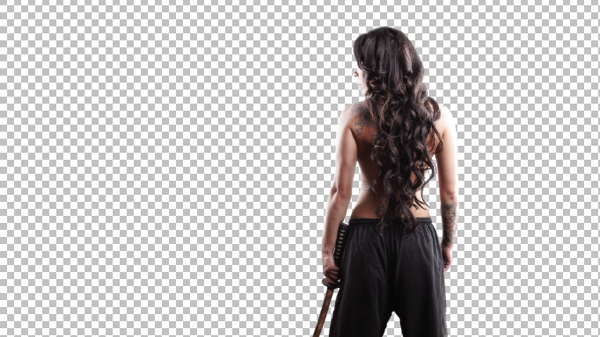


4 Integrate into Image


I usually work on picture in the 16:9 format. Sometimes I quickly sketch my ideas on a piece of paper or on the iPad. I basically gives me an idea about the composition of the image. As soon as Jessica was extracted from the background I moved her over to the canvas using the move too. I scaled her down and positioned here approximately. I slightly corrected her position once the background was inserted.


5 Original BG


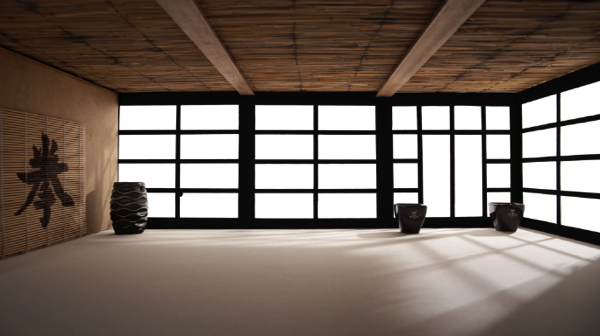
At this point I also imported my background in order to see what color corrections would be needed to integrate Jessica into it. When I opened the stock image for my background I saw some things that would need modification.
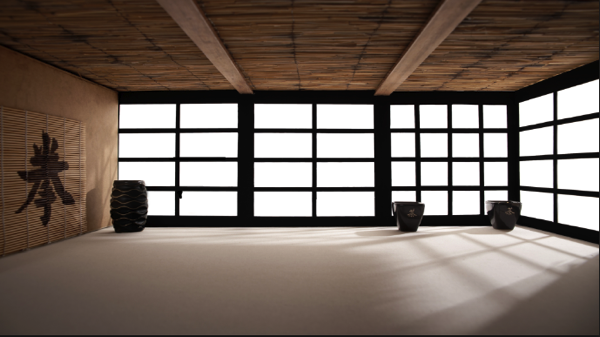


7 Corrected Bg


I didn't like the doors on the right side as it would look weird when Jessica would be in position. So I just added some horizontal bars to solve that issue.


6 Gradient for Model


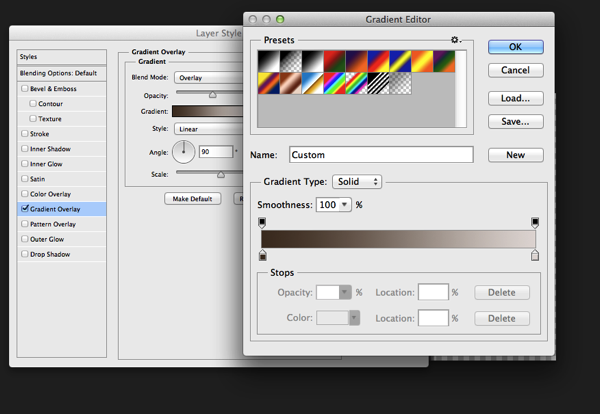
The first step I used to integrate Jessica was a Gradient map. The colors I used for the shadows was a sample of the wooden door frame (very dark brown) and for the highlights I used a sample of the Tatami. I lowered the opacity to about 45% to achieve an acceptable value. It's important when you use this method that you use colors that are already present in the palette of the image.


8 Samurai


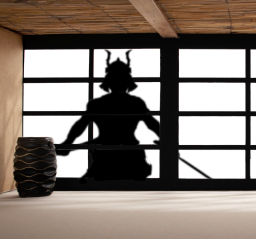
Next step was to integrate the Samurai. I've build the Samurai out of several stock photos and used an adjustment layer to darken it to complete black. I used a layer mask to hide the wooden frame of the window.


9 Samurai Eyes


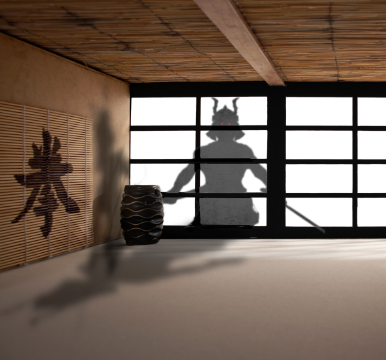
In order to make it more realistic I've added a dirty texture on top of the Samurai with a blending mode Overly and I slightly blurred him, since what we actually see is a shadow on the fabric. I then added the eyes with the brush tool and some subtle outer glow effects.


Next step was to create the shadows on the floor and the wall. I duplicate the Samurai Layer and used distort and warp to adjust it's shape. I also painted the shadows onto the barrel, in the original picture the barrel was brightly lit from the right side. Since the Samurai is standing in front of it, the light source would be blocked.


13 Overlay Color


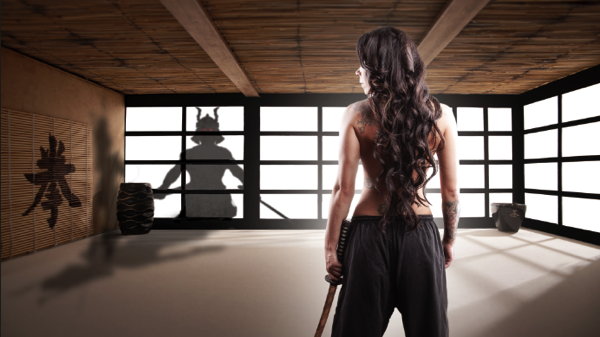
To blend everything together I use a simple technique that is not well known out there. I merge all the Layers together onto a new Layer ( Shift+Ctrl+Alt+E (PC) or Shift+Command+Option+E (Mac) ) and then use the Blur Average Filter. Switch the blend mode to overlay and reduce the opacity until the color matches. I then used the Tilt-Shift filter to align the average depth of field of Jessica to the background.
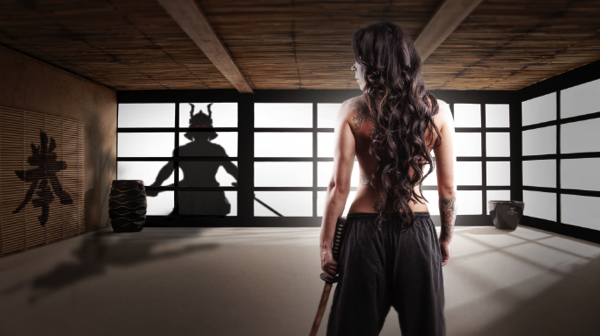


14 tilt Shift and Light


Finally I created a new layer on top of it change it's blending mode to overlay and painted with a soft black brush around the samurai and around Jessica in order to direct the viewers eye through the picture. A last step was to lay a grungy texture in overlay over the whole image and reduce it's opacity quite a bit.
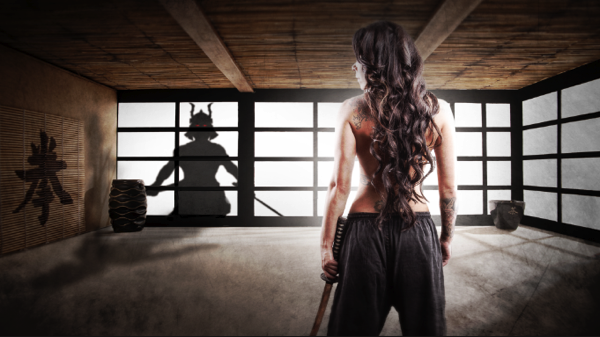


15 Final


I try to do a maximum in Photoshop in terms of light and shadows. But when I finish an image I always have some fun in Lightroom with some presets or simply play around with the sliders. Some times I end up not using any of it, but most of the time I find some settings that adds value to the overall image. Now there is no secret to this, I just play around with Clarity, Blacks, Temperature, and Contrast until I see it going somewhere. In this case I added some contrast, quite a bit of Clarity and slightly desaturated the image.
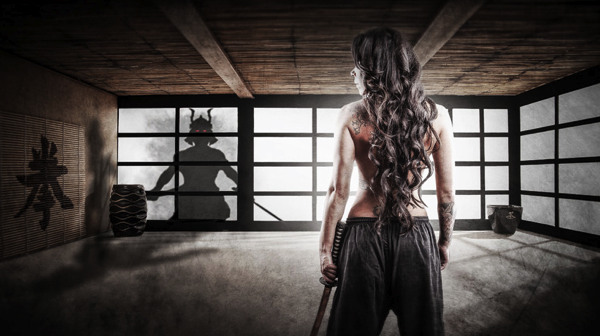


16 Final LR


Here's the video of the whole process dialed up to about 1000%


Check out more of Tom Di Maggio's work at his websites at TomDiMaggio.com, Purple-Monkey.com" and on Facebook.


Post originally from: Digital Photography Tips.

Check out our more Photography Tips at Photography Tips for Beginners, Portrait Photography Tips and Wedding Photography Tips.


Samurai Girl Composite: Behind the Scenes Post Production Walk Through

DEAL: 30% Off Phil Steele’s Photoshop Basics Online Course


NewImage


Over on our sister site - SnapnDeals - we have a great offer running right now - it gets you 30% off Phil Steele's Photoshop Basics for Photographers course.


Many of your have taken Phil's other courses and will be familiar with his helpful videos so will know that he always delivers great training for photographers.


Over 13 easy to understand modules this course will teach you how to take your photos to the next level with some simple post production techniques in Photoshop.


Normally the course is $47 but with this Snapn' Deal it is just $33.


Check out full details of what's included here.


PS: if you're interested in weekly promotions like this just add your email address to the field below and we'll send you a weekly update of all new deals.


It's free, we don't share your details with anyone and you're welcome to unsubscribe any time if you don't find the deals to be for you.


Post originally from: Digital Photography Tips.

Check out our more Photography Tips at Photography Tips for Beginners, Portrait Photography Tips and Wedding Photography Tips.


DEAL: 30% Off Phil Steele's Photoshop Basics Online Course


Thursday, August 29, 2013

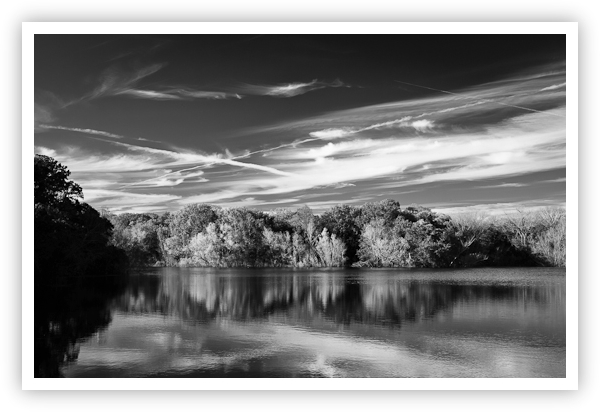
Reflections in Black & White


Winter is a funny time of year in central Texas. The leaves have mostly fallen and the fields turned golden brown. The southern sun is much lower in the sky and the light is both softer and less harsh. Though the days have grown shorter, the shadows have grown longer. It’s as if the “magic hours” we nature photographers so love have been extended just when we need them the most.


Reflections in Black & White – Smithville, Texas
Copyright 2009 Jeff Lynch Photography
Shot taken with a Canon EOS 5D Mark II set on aperture priority (Av) using an EF 24-105mm f/4L IS USM lens tripod-mounted. The exposure was taken at 50mm, f/13 for 1/25th of a second at ISO 100 using a Singh-Ray warming polarizer. Post capture processing was done in Adobe’s Lightroom 3 Beta using Nik Software’s Silver Efex Pro for the black & white conversion. Click on the image above for a larger version.


Many folks look at winter as a time to put their camera and tripod away and wait for spring. For me, winter offers an incredible opportunity to look past the colors of the other seasons to the rich textures offered only in winter. It’s a time to “see” each shot in black & white just as I did when shooting Kodak Pan-X, Plus-X and Tri-X back in the mid 1970′s. There’s something almost “zen like” about shooting in black & white (or in the case of digital, converting to black & white) that clears the mind and focuses the senses. It feels like home.


Posted in Photography Tagged: Buescher State Park, Canon, Canon 5D Mark II, Landscape Photography, Photography, Texas Landscapes


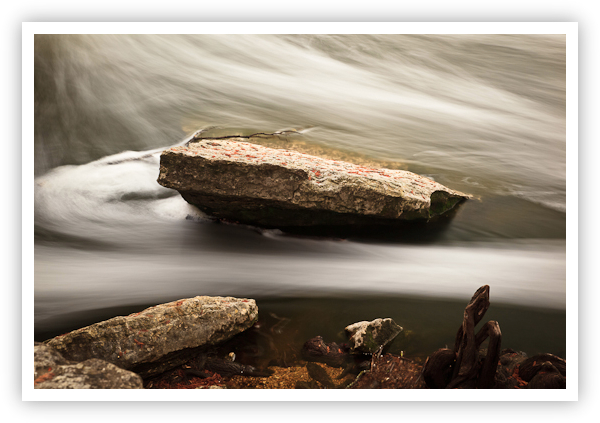
Rock Solid Motion


Here’s another shot taken a few weeks ago at McKinney Falls State Park in Austin. I’m really enjoying the new Singh-Ray Vari-ND-Duo filter and how easy it makes long exposure photography. Forgive my shameless self promotion, but did you get a chance to read my recent post on the Focus on Singh-Ray Filters blog yet?


Rock Solid Motion – McKinney Falls State Park, Texas
Copyright 2009 Jeff Lynch Photography
Shot taken with a Canon EOS 5D Mark II set on manual (M) using an EF 24-105mm f/4L IS USM lens tripod-mounted. The exposure was taken at 65mm, f/14 for 6 seconds at ISO 100 using a Singh-Ray Vari-ND-Duo neutral density and warming polarizer filter. All post capture processing was done in Adobe’s Lightroom 3 Beta. Click on the image above for a larger version.


Posted in Photography Tagged: Canon, Canon 5D Mark II, McKinney Falls State Park, Nature Photography, Photography


Wednesday, August 28, 2013

Gear Friday: Sanyo Eneloop Batteries


I’ve been using small strobes (Speedlites) for my product photography work for some time now and one problem that continues to dog me is inconsistent battery life. I love the flexibility my Canon 580EX II’s provide me but these little buggers will drain a set of NiMH rechargeable batteries fairly quickly so I’m recharging sixteen to twenty batteries almost every night.


The other problem with typical NiMH batteries is predictability. I never seem to get the same number of shots from any two sets of freshly charged batteries. Since I shoot with three strobes this means one or two always seem to give out just as I get things rolling. I also hate the fact that NiMH batteries seem to self-discharge rapidly when NOT being used. This means that I always have to recharge the batteries right before a shoot.


A few weeks ago a friend suggested I look at Sanyo’s eneloop batteries, which he said “solved the self-discharge and consistency” issues I’d been facing. So I bought a set of four, along with a charger and set out to see if he was right. Man, was I in for a few pleasant surprises!


  • Sanyo eneloop batteries come pre-charged just like alkaline batteries and can be used right out of the box.
  • Sanyo eneloop batteries seem to last MUCH longer than NiMH batteries AND alkaline batteries in my Canon 580Ex II’s.
  • Sanyo eneloop batteries actually cost slightly less than conventional NiMH batteries.


Today I use Sanyo eneloop batteries in all my Canon 580EX II’s and my CP-4E battery packs. I can shoot hundreds of product shots in a day without having one or more strobes give out in the middle of a shoot. I’m not constantly changing out batteries and using every outlet in sight to recharge batteries right before a shoot.


I know this may seem trivial on the surface, but it’s one of these little things that has always annoyed the hell out of me. Now I can concentrate on getting the shot rather than fiddling with batteries all day long.


For more information on how the Sanyo eneloop batteries work please visit Sanyo’s eneloop web site. Most of what I read went right over my head but you might have better luck. BTW, Sanyo does not sponsor Serious Amateur Photography or myself and all opinions discussed in this editorial review are my personal views based upon my personal experiences. As always, your mileage may vary.


Posted in Photography Tagged: Canon 580EX II Speedlite, Photography, Sanyo eneloop batteries, Strobist


Simple Landscape Composition Rules


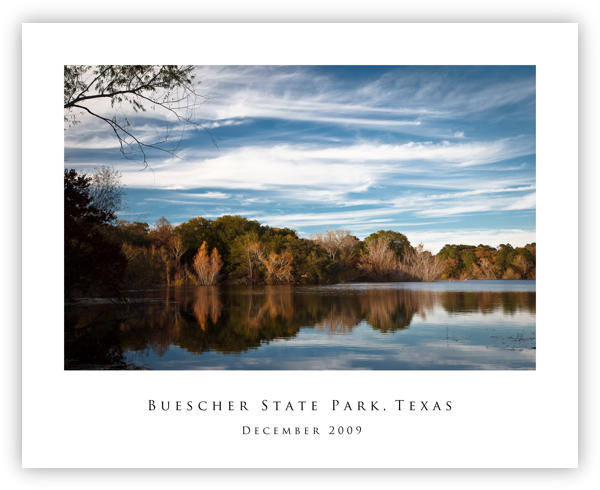
I hesitate to write this post since there are about as many rules of composition as there are photographers and the best landscape images I’ve ever seen break these rules with impunity. It’s hard to describe what makes the composition of a certain image “work” for me and I rarely follow the “rule of thirds”. For me it’s more a feeling of “rightness” than anything else, although I do tend to follow Moose Peterson’s advice; "Regardless of where the horizon is, a good landscape image needs an interesting foreground, middle-ground and background to pull the viewer into the image".


Take this image for example. I walked around this small lake at Buescher State Park in Smithville, Texas looking for different shots to capture. The late afternoon light was almost perfect and the still lake reflected the autumn colors beautifully. The reflections in the water made a wonderful foreground with the trees providing the key subject of the middle-ground and the high, thin clouds providing a striking background. I used the tree branches on the left to add some framing to the image.


Picture Perfect – Buescher State Park, Texas
Copyright 2009 Jeff Lynch Photography
Shot taken with a Canon EOS 5D Mark II set on manual (M) using an EF 24-105mm f/4L IS USM lens hand-held. The exposure was taken at 47mm, f/16 for 1/10th of a second at ISO 100 using a Singh-Ray warming polarizer. All post capture processing was done in Adobe’s Lightroom 3 Beta. Click on the image above for a larger version.


Posted in Photography Tagged: Buescher State Park, Canon, Canon 5D Mark II, Landscape Photography, Photography, Texas Landscapes


Monday, August 26, 2013

Polina by Mikhail Malyugin


Beautiful make-up photography by an artist from Novosibirsk, Russia - Mikhail Malyugin. Enjoy!


Polina by Mikhail Malyugin


Polina by Mikhail Malyugin


Polina by Mikhail Malyugin


Polina by Mikhail Malyugin


Polina by Mikhail Malyugin


Polina by Mikhail Malyugin


Polina by Mikhail Malyugin


Polina by Mikhail Malyugin


Visit Mikhail Malyugin


Dario Scapitta Design LookBook


BLACK ROSE collection


Nature, art, architecture, fashion.


These are just some of the many source of inspiration for the Dario Scapitta Design's creations. New interpretation and contemporary shapes to create unique jewelry, made using advanced technologies as 3d printing. Each object is highlighted by a touch of glamour and elegance, that does not leave you indifferent.


SNAKE Collection


My work is evolving every day, always looking new forms and material combinations.


My creation are not just jewelry, but modern body ornaments. Comfortable and easy to wear e very day or in a special event, always to highlight your style.


BLACK ROSE Collection


SNAKE Collection


COUPE DE COEUR Collection


BLACK ROSE Collection


Photograpy:


Lara Bommartini - yourstyle fotographie - Enschede


Model:


Nikita Paauwe


Sunday, August 25, 2013

Photography by Bogna Altman


Amazing Photography by Vancouver, British Columbia based photographer Bogna Altman. Bogna is also a jeweler, painter and interior designer...


More photos