Monday, June 30, 2014

Panasonic Lumix DMC-G6 Review


Panasonic Lumix DMC-G6 Review.jpg


If it looks like a DSLR, feels like a DSLR, works like a DSLR and takes pictures like a DSLR, it probably is a DSLR. Izznit?


Nup. This 'un is a MILC - mirrorless interchangeable lens camera ... one of the many models now proliferating on the market like rabbits.


In reality, the major difference between this MILC and true blood DSLRs is that, with the former, the top Live viewfinder presents an electronic view of the shot you're about to fire, while the DSLR delivers an optical view, thanks to a prism and a series of mirrors ...just like the ole time film cameras used to do!


True, the electronic view is not as razor sharp as the optical, it does look a bit 'electronic' and very alike to the view delivered on the rear LCD screen, but when you're outdoors, as many of you know, the rear screen can be washed out in bright light, so Live View to the rescue.

Panasonic Lumix DMC-G6 back.jpg


Panasonic Lumix DMC-G6 Review Top.jpg


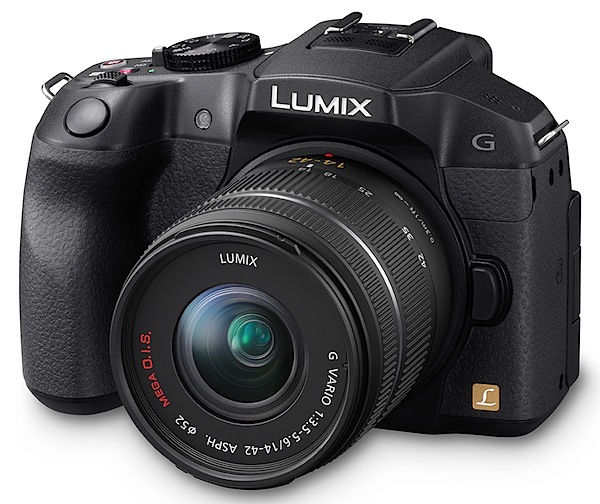
The review camera was furnished with a Panasonic-made G Vario lens of f3.5/14-42mm specs.


The G6 is a welcome addition to the lineup. In stills, it can pull a maximum image size of 4608 3456 pixels, leading to a 39x29xcm print.


In video capture, it can shoot AVCHD or MPEG4 formats at Full HD 1920 1080 pixel resolution using a Class 4 card or better. And you can shoot stills while recording video. Auto focus tracking locks on the subject and maintains focus even as it moves.


Panasonic Lumix DMC-G6 Handling


It sure feels like a DSLR! And it is a comfy feel in the hand, mostly thanks to the pronounced speed grip and overall good balance.


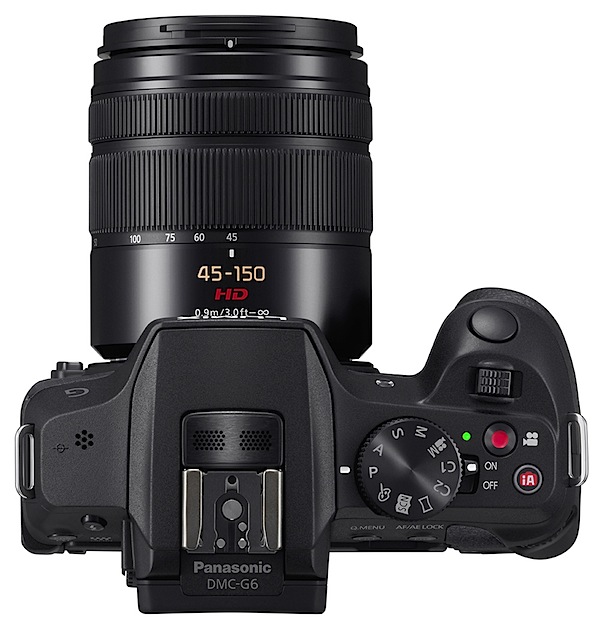
Top deck controls: there's a hot shoe on top centre to accept an auxiliary flash (in addition to the lower powered internal flash beneath the hot shoe).

Creative Guides.JPG


Panasonic Lumix DMC-G6 Menu 1


Panasonic Lumix DMC-G6 Menu 2


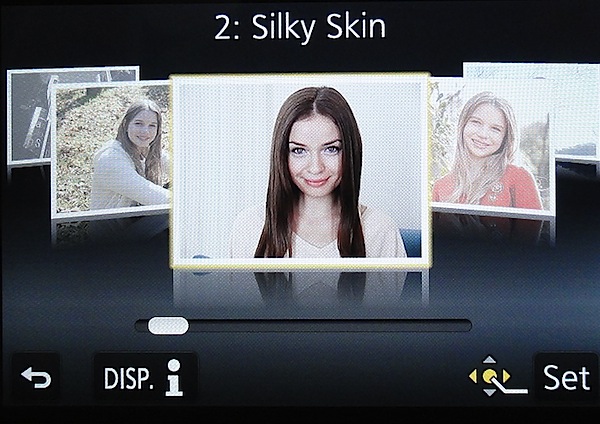
Farther right is the mode dial with positions for PASM, creative video, two custom modes, panorama, a scene guide and a creative control mode. The scene guide offers 23 sample pictures shot by pro photographers which you can use as a helper in making your own shots ...like silky skin, glistening water etc. The creative control mode has 19 filters (old days, sunshine, retro, etc. The effect parameter of each mode is adjustable.


And, for what it's worth, the camera can only shoot panos while held in an horizontal attitude, unlike the methods that some other cameras can deliver.


If you want to shoot in auto mode you move your finger farther right and tap a tiny red button marked 'iA'. The power lever is set into the side of the mode dial. Close by is the familiar video record button, hemmed in by the mode dial, power lever and intelligent auto button ...it is not the most ideal position for this button and takes quite a bit of precise pressure to operate.


Forward on the top deck is a control I had not seen before: a lever that could be used in either of two ways: it could drive any exposure compensation you desire by +/- five f stops; or with specific power-driven lenses, it can operate the zoom. Additionally, just to the rear and over the corner edge of the camera is a control dial which adjusts aperture or shutter while in those modes.


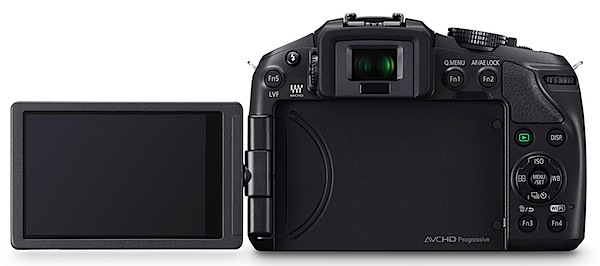
Rear: the 7.6cm LCD touch screen is a vari-angle screen that can be rotated 180 degrees laterally and 225 degrees vertically. At the extreme left is the internal flash release and a function button that switches between top and rear finder; to the right are two more function buttons. Flanking the screen are the replay button, another for display options plus two more function buttons. The jog dial has positions for menu; ISO setting; direct setting of options for AWB, colour balance etc; continuous shooting and self timer; AF options.


A 3.5mm terminal is set into the camera's right side to accept an external microphone.


Overall, not a fully packed brigade of external controls. The viewfinder menu is not overly complex.


Narrabeen lake 2.JPG


Seats 2.JPG


Trees 2.JPG


Panasonic Lumix DMC-G6 Features


A Wi-Fi connection allows users to connect the G6 to their smart phone or tablet at a touch, while still and movie shooting can be driven remotely from the smart phone screen.


Roof original.JPG


Roof retouched.JPG


And a couple of unusual features: time lapse and stop motion video shooting; a novel Clear Retouch function lets you edit out unwanted parts of a picture after shooting by simply tracing over them on the monitor with a fingertip; I tried this and it works (above)! But only with large areas of unwanted image data: don't think you can remove wicked Uncle Ted from a family group shot!


Panasonic Lumix DMC-G6 ISO Tests


Panasonic Lumix DMC-G6 ISO 160.JPG


Panasonic Lumix DMC-G6 ISO 400.JPG


Panasonic Lumix DMC-G6 ISO 800.JPG


Panasonic Lumix DMC-G6 ISO 1600.JPG


Panasonic Lumix DMC-G6 ISO 3200.JPG


Panasonic Lumix DMC-G6 ISO 6400.JPG


Panasonic Lumix DMC-G6 ISO 12800.JPG


Panasonic Lumix DMC-G6 ISO 25600.JPG


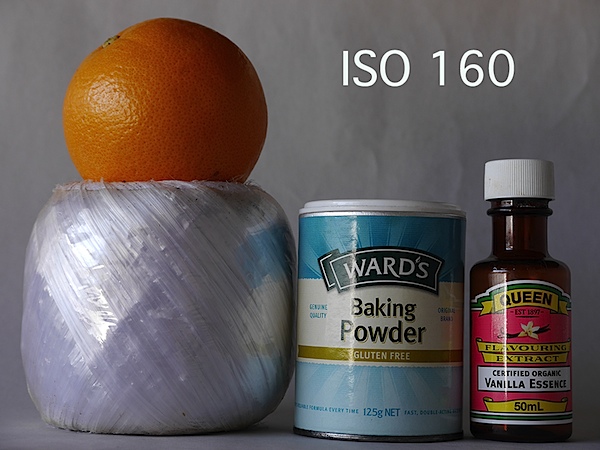
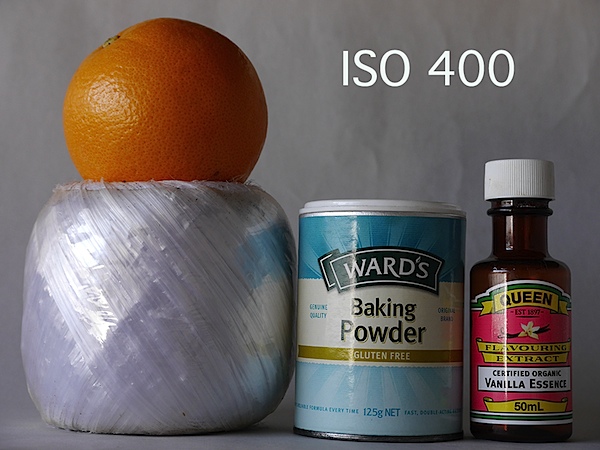
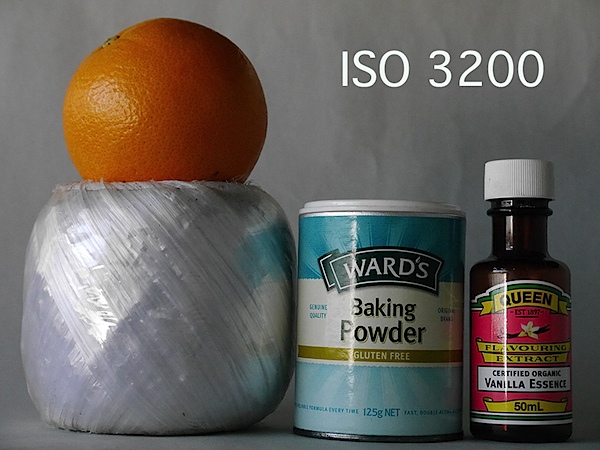
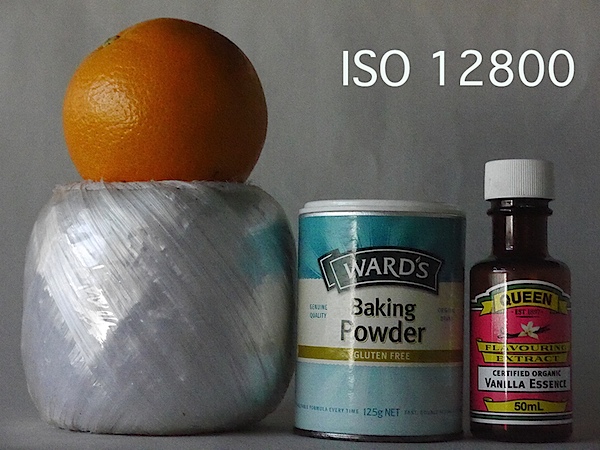
It's only at ISO 6400 that the image begins to degrade. Much the same at ISO 12800.


By ISO 25600 the show's over: much noise, artefacts and a washed out image.


Panasonic Lumix DMC-G6 Review Verdict


Quality: above average.
Why buy the Panasonic Lumix DMC-G6: looks and works like a DSLR.
Why not: a bit complex for the raw amateur.


If you get the feeling that this camera attempts to bridge the needs of the enthusiast and the dabbler, you're right. Just check out the creative and scene guides.


However, I would not be unhappy to use it on an advanced shoot!


Panasonic Lumix DMC-G6 Specifications


Image Sensor: 16.1 million effective pixels.
Metering: Multiple, centre-weighted and spot.
Effective Sensor Size: Four thirds 17.3 13.0mm CMOS.
Lens Factor: 2x.
Compatible lenses: Micro Four Thirds.
Exposure Modes: Auto, Program AE, shutter and aperture priority, manual.
Shutter Speed: 60 to 1/4000 second; flash sync 1/160 sec.
Burst Speed: 7 fps.
Memory: SD/SDHC/SDXC cards.
Image Sizes (pixels): 4608 3456 to 1712 1712. Movies: 1920 1080, 1280x720p, 640 480.
Viewfinders: Turret finder: 1,440,000 pixels. 7.6cm LCD screen (1,040,000 pixels).
File Formats: JPEG, RAW, JPEG+RAW, AVCHD/MPEG4, MPO (3D).
Colour Space: Adobe RGB, sRGB.
ISO Sensitivity: Auto, 160 to 12800 (25,600 with boost).
Interface: USB 2.0, AV, HDMI mini, WiFi, DC input.
Power: Rechargeable lithium ion battery, AC adaptor.
Dimensions: 122x85x71 WHDmm.
Weight: Approx. 390 (inc battery).
Price: Get a price on the Panasonic Lumix G Series DMC-G6 with 14-42mm II Lens Kit or body only.


Post originally from: Digital Photography Tips.

Check out our more Photography Tips at Photography Tips for Beginners, Portrait Photography Tips and Wedding Photography Tips.


Panasonic Lumix DMC-G6 Review


10 Things I Learnt from Daily Shooting


A Guest Post by David Powell from Shoot Tokyo


Dave.jpeg


Here are a few lessons I have learnt from daily shooting... I hope you enjoy.


1. "Do or Do Not.... There is no Try"


A lot of people shoot daily as they are lucky enough to have a career in photography. Others embark on a 365 project while others just take photos all the time. I decided after I started ShootTokyo that I wanted to shoot daily as a way to try and rapidly improve my photography.


Shooting daily isn't hard. It does require dedication, creatively and planning. It actually gets significantly easier with time as well. When I first started I would rack my brain for something interesting to photography but now you can put me just about anywhere for 10 minutes and I can find lots of ways to photograph it.


2. Bring your Camera Everywhere


To capture great images you need to have your camera with you. People always ask me where I find the time to shoot. Honestly I shoot whatever is in front of me where ever I am going. Most of the great shots you will take aren't planned or set up. Events or situations unfold and you capture them.


Having my camera with me allowed me to capture the events of the March 11th Earthquake in Japan as I was experiencing it and share it with my family, friends and ultimately strangers worried about their loved ones in Tokyo.


1.jpeg


Having a camera allowed me to capture this woman checking the news about the earthquakes while on a break.

2.jpeg


3. Take Pictures of People


One of the most interesting pictures you can take is of people. I'll let you in on a secret. Most people love having their photograph taken. Many photographers are very shy about asking people if they can take their photo so they end up trying to sneak a shot. This is just something you have to get over. While most people like having their photo taken, they also like to know it is happening. I have found that 9 out of 10 people will say sure and give you a big smile or pose of whatever you are looking for when asked. The approach I have taken that seems to work is being genuine and I simple ask 'Do you mind if I take your photo?'. Often I will ask them to continue doing whatever they are doing and I take my shot. I also carry these business cards that I call 'photography cards' that I give people and let them know they can email me and I will happily send them a high resolution photo for their troubles. Probably 10% actually email me but giving them a card makes the interaction more 'legitimate' and puts people at ease.


3.png


I have learnt to not be shy about asking if I can take someone's photo and I am so pleased with the results I can get now... Check out this hip chick at Shibuya's Hachiko...


4.jpeg


This beautiful girl passing through Shibuya Station...


5.jpeg


and dogs...


6.jpeg


4. The Less Gear you Carry the More Photos you take


This is a lesson I learnt the hard way after dragging excessive amounts of camera gear across Tokyo and when I was traveling. Typically I would leave the house with my Canon 5DMKII. I wanted to ensure I would catch any shot so I will make sure to bring a good assortment of lenses; 16-35mm, 24-70mm, 50mm, 135mm and maybe my 70-200mm. I would also have an assortment of filters, a flash or two and other odds and ends. At the end of the day, I spend all of my energy lugging gear around that I didn't spend nearly as much time shooting. The reality is you can make great photographs with whatever gear you have granted you know how to use it.


Now more often than not, I leave the house with a single prime (fixed focal length) lens. This allows me to focus on taking pictures and bringing out my creativity to capture the shot I need with the only focal length I have. I carry the most minimal of accessories; extra card, extra battery, an ND filter and a cloth to wipe the lens. That's it.


Do I miss some shots due to my limited gear? Sure, but what I missed is easily made up by all of the other shots I get.


7.jpeg


5. Force Yourself to Shoot one Lens for a Week


A big part of making #4 work is knowing how to use your gear. I realized I would often carry multiple lenses as I didn't know how to get a shot or the shot I wanted with the tools I had. I would feel like I was limited with a 50mm so I would want to make sure I had a 70-200mm if it was far away, and a 24-70mm in case I needed to zoom to capture what I needed, or maybe a 16-35mm in case I needed to capture it wide. I now shoot almost exclusively prime lenses. With my Leica M9 I shoot a 21mm f/1.4 Summilux, a 35mm f/1.4 Summilux and a 50mm f/0.95 Noctilux.


8.jpeg


The reality is you can capture a great shot with probably any lens you have with you provided you understand how to use the gear you have. What I mean by this is what shots work for a given lens. What angle or distance do you need to be at for this particular focal length to give you the perspective you want. I was great at shooting my 50mm lens but I really struggle with my 35mm and had just purchased a 21mm and did not really understand how to get the most out of it. I forced myself into a lens rotation where I shot a single lens for a week. I'll be honest, it was incredibly frustrating for me. At times I wanted to just switch to a different lens as it was impossible to get the shot I wanted or needed but after a few days it became much easier to get the shots I was looking for and soon I was able to pre-visualize the shots before I even lifted the camera to my eye. Now I can walk the streets at ease with any of my prime lens and come home with a card full of shots that I am happy with.


9.jpeg


10.jpeg


11.jpeg


6. Develop a Personal Style


There is no right or wrong with photography. Some people love flashes. Others just shooting with their iPhones. Some love to photoshop their pictures for hours. Do what you love doing. One thing shooting daily has helped me to do is develop a personal style of shooting. When I first started I was always watching people and trying to see if I could shoot like 'them'. This was helpful to get me to learn to use my gear but once you know how to use your camera, you need to develop a style that is yours. I don't have a name for my style but I like a lot of selective focus and clean, natural pictures. I do next to no post processing on the photos. The most I will do is clean up any dust spots, crop a little, or adjust exposure but for me photoshop on my Mac is to correct little imperfections but not for making pictures.
I like to use very narrow depth of fields to tell my stories. There are no hard and fast rules to what you can and can't do, should or shouldn't do. Learn the basics and then decide how you choose to apply them.


12.jpeg


I love to use a narrow depth of field and throw primary colors out of focus.


13.jpeg


I've learnt to love photographing people once I got over the initial fear of asking people if I can take their photo.


14.jpeg


I love combining shallow depth of field with lots of contrast like in this picture of 'Dark Shibuya'...


15.jpeg


7. Shoot out of Airplane Windows


I have never been one of those people who shoot out of airplane windows. I have flown probably close to 1,000,000 miles in my career and can't believe all of the subjects I have missed; Alaska, Mt Fuji, the slums of Mumbai, Chicago skyline, arrivals in Boston. This is something that I started doing this year and I have been so pleased with the results.


16.jpeg


8. Try new Things


Try different types of photography as you are trying to learn what it is you like. I was surprised to find out how much I enjoyed photographing the moon, how easy it is and that I already had all of the things I needed. If you want to learn how to photograph the moon, read THIS. (link to: http://shoottokyo.com/photograph-moon/ )


17.jpeg


I also developed a love for HDR. This is the only time I am using software to modify my images. HDR can easily be overdone so I need to be careful but I found I really enjoyed it. My inaugural post on Shoot Tokyo was on HDR. You can read it HERE.


18.jpeg


Panning is a great way to bring motion and movement to your photos to make them come alive. If you don't know how, read THIS.


19.jpeg


9. Shoot at Night


I do the majority of my shooting at night. I am surprised how many people stop shooting when the sun goes down. What you need is a tripod, a low ISO and some practice. There is so much to photograph when the sun goes down.


Like light trails...


20.jpeg


Evening construction sites...


21.jpeg


Cities


22.jpeg


10. Backup Everything


I can't stress this point enough. I had a serious run of bad luck with Macs last winter and this spring. I actually had 5 complete hard drives failures on my Mac(s). Each time I was able to get Apple to do a complete replacement of my machine but it kept happening. They were never able to root cause the problem but I am running safe and sound on a Mac outfitted with Solid State Flash Drives. I am very paranoid by nature so I was fortunate enough not to lose a single photograph throughout these issues. This experience just reinforced what I already know; backup everything, often and to multiple locations. I have friends and know fellow photographers that have lost their hard drives without backup. I can't imagine the feeling of losing all of my photos but I am do my best to ensure this never happens to me.


23.jpeg


Currently I backup using Apple's Time Machine to Western Digital drives connected with FireWire. I do this as I travel often and the backup drive comes with me. A lot of people stop backups while traveling is when you can run into an issue such as losing a drive, downloading a virus, or having a laptop stolen. When I pull the data off cards and onto my Mac it is backed up before I delete the data off of the cards. I also have several additional drives that I rotate copying my entire 'pictures' folder to once a month as an additional backup.


I hope you found this useful!


Dave Powell is a blogger and photographer based in Tokyo, Japan. He writes Shoot Tokyo photography blog. You can see more of his work at www.shoottokyo.com or follow him on Twitter and Google +.


Post originally from: Digital Photography Tips.

Check out our more Photography Tips at Photography Tips for Beginners, Portrait Photography Tips and Wedding Photography Tips.


10 Things I Learnt from Daily Shooting


Sunday, June 29, 2014

It’s Not Always Sunsets and Kittens: Photographing the Tougher things in Life


Not every shoot I've done is full of lollipop promises, cute matching (but not too matching) outfits, and happy families throwing their kids up into a perfect blue sky with puffy cloud dreams. In fact, typically the ones that didn't, are among the most important pictures I have ever taken. The ones that there are no road maps for, no instructions, and no cheat sheets. Several years ago I photographed a beautiful wedding of a young couple deeply in love on a perfect July day. I shot the wedding, went home, and put those images at the bottom of my "waiting to be edited" stack. Which is where they stayed until I got a random call that the groom, a police officer, had gone missing in an attempt to save a young girl who had almost drowned in a fast moving river. For three days rescue teams searched for him, until they found his body a day shy of his and his new bride's first month anniversary.


I Googled everything I could think of in an attempt to edit the images, perfectly and quickly with poise and professionalism, as I knew that they would now would hold a gravity beyond what I could have ever imagined when I shot them. I found nothing-no road map, no instructions, no guide for this massive task I had ahead of me. Instead I holed up in my office for a weekend with a bottle of scotch and a case of tissues, emerging in time for them to be delivered to his bride at his memorial service. Those images are now locked in a vault of sorts for me professionally, and I can only hope that by now they perhaps bring an amazing and strong woman great comfort and lovely memories of a beautiful day in her life.


Photography is a very powerful thing. And having the ability to do it is an incredible gift. Not all tough to photograph events will be dire, but do photography even just as a hobby for long enough and you will find yourself in situation beautiful in it's complexity and the images you take poignant beyond words.


This is a picture of my dear friend, her son, and her son's birth mom. It's out of focus and isn't properly exposed. The kid is wearing a Captain America costume and was feeling especially "spirited" on this day. It is all of the makings of disaster. Yet it is one of my favorite images and incredibly important to both myself and the people in it. A picture doesn't have to be technically perfect to be amazing. Sometimes it's just you being in the right place at the right time, hauling a camera in tow. Sometimes it's a matter of you being invited to something very special because you have been trusted to document it. What a beautiful responsibility that is. Sometimes it's not about the where and the how you do it; it's about that you showed up and did it. The pictures you take may turn out perfect. They may not. Either way, they will be treasured as great gifts.


IMG_3380b


Every once in a while I get asked to photograph someone (or a pet) who is gravely ill, or a funeral or memorial service. I have never been in a situation personally to want a photographer at something like this, but I am always honored when asked to do something so significant. This is one of those situations where if you have any reservations at all, you should politely decline. It's a heavy task, one that can only be done with complete focus and presence. The first thing I do if I've been asked to photograph something like this is make absolutely certain that the immediate family members are all in agreement in wanting my services and what exactly that means to them. While I have personal guidelines, I want to be sure that what they are wanting works with these, and also something I will be able to do with great compassion. Each time I've photographed this type of situation I have come across someone that didn't feel I should be there or was confused by my presence and camera. My best advice is to reply very simply and quietly: "I was asked to be here today" and move on. Not everyone will understand why a photographer was requested. Often I don't understand myself. But I know that I am doing something important as part of a healing process for another and that's reason enough.


IMG_0213b


IMG_9323b


Sometimes the occasion is joyful and wonderful and still requiring of great tact and compassion. Homecomings, be them military or adoption or just long awaited, fall into this category. If you have been invited to something like this, take a moment to be a bit proud of yourself. Go on-I'll wait. This means that you have been asked to be part of a moment so delicate and special that your abilities are obvious and you are trustworthy beyond measure. Your camera may have been your golden ticket in the door, but your skills is what will get the job done. This is one of the few times I stay completely out of the way and ask nothing of anyone. I am there only to document, not set-up moments or force poses and smiles. The event will happen so naturally and beautifully on it's own that you need only to trust in yourself, stay alert and in the moment, and know that the most intense moments will happen very, very quickly.

IMG_0207b


IMG_0243b


In my humble opinion, there is no greater honor than being trusted to photograph someone. Making the honor of being asked to photograph a human coming into this world the highest of the high. If you ever get the chance the witness life start, I highly recommend it. Most of this is going to be common sense, but in this case, don't shoot for the moon. You are documenting something so special, so amazing, there is no need to force a specific shot. In a perfect world, you'll be allowed to stand near the mother, at the top of the bed (or similar), lessening the chances of angles that no one will want pictures of, and increasing the chances of being able to stay out of the way. Photographing a birth is one of the only times I truly have to use everything I have to hold it together and do my job. But it turns out you can focus (literally and figuratively) through a layer of tears pretty easily if you need to. Much like birth itself, this is pure adrenaline; nothing to plan, no way of knowing what shots you are going to get. I do like to always ask if there is something special that is hoped for-perhaps the first bath or a picture of the baby getting weighed. Things like that are usually possible and of importance for some. Photographing births is a game of hurry up and wait and only a couple of things are certain: good glass, a high ISO (no one wants a flash here and the room is often dark), and impeccable manners.


IMG_4838b


IMG_4846b


These type of images may not end up being part of your portfolio, they may not be technically perfect in any way, but likely to someone they will mean everything.


Post originally from: Digital Photography Tips.

Check out our more Photography Tips at Photography Tips for Beginners, Portrait Photography Tips and Wedding Photography Tips.


It's Not Always Sunsets and Kittens: Photographing the Tougher things in Life